RiskGuard Manual Structure
1. Introduction
2. Installation and Configuration
3. Description of the Operating Panel
4. Description of All Parameters
5. Description of "RiskGuard" Functions
Introduction
📌 What is "RiskGuard"?
"RiskGuard Management" is an advanced software for risk management in trading, designed to optimize capital control and reduce the impact of emotions on trading decisions .
With its innovative features, "RiskGuard" helps traders calculate the correct lot, protect capital, manage trades intelligently and prevent emotional errors.
-
It works on "MetaTrader 4", "MetaTrader 5" and "cTrader" .
-
Automates risk management to allow traders to focus only on strategy.
-
Suitable for both beginners and professionals , with advanced levels of customization.
Unlike standard tools offered by trading platforms, "RiskGuard" integrates an automated risk management system that allows you to avoid human errors, improve trading discipline and increase the sustainability of performance in the long term.
With "RiskGuard", the trader has full control of his operations, without any more worries related to manual risk calculations and position management.
📌 Who is "RiskGuard" for?
“RiskGuard Management” has been designed to meet the needs of all traders , regardless of their experience level.
1. Beginner traders
For those who are just starting out in the world of trading, the biggest risk is emotional management and inexperience in correctly calculating the lot, setting the stop loss or avoiding common mistakes.
-
"RiskGuard" helps new traders to adhere to correct money management , preventing impulsive changes to stop losses and limiting daily drawdown.
-
Automates lot calculation based on chosen risk, eliminating the need for manual calculations.
-
It allows you to learn to manage risk in a disciplined and safe way.
2. Intermediate traders
Traders with a little more experience begin to refine their strategies , but often find themselves having to deal with situations of overtrading , high drawdowns or poor consistency in their trades.
-
"RiskGuard" offers advanced tools to control risk more strategically .
-
Features such as "Partial Profit", "Break-Even" and "Closing Time" allow you to optimize your exits from the market without missing opportunities.
-
The "Quantum" algorithm helps to set a dynamic risk based on statistical data, reducing exposure at critical moments.
3. Professional traders
Experienced traders seek maximum efficiency in risk management , reducing manual intervention and letting the software take care of repetitive but essential aspects.
-
"RiskGuard" allows management of multiple trading accounts , facilitating the replication of orders with different risk levels.
-
Features such as “Trade Replication” and “Automatic Journal” streamline workflow and performance analysis.
-
The ability to customize risk and advanced settings makes it an ideal tool even for those who operate with high-frequency trading strategies .
Whatever your level of experience, "RiskGuard" helps you improve your trading, reduce the risk of errors and optimize your trading strategies.
📌 Compatible platforms
"RiskGuard Management" is compatible with major trading platforms:
1. "MetaTrader 4 (MT4)" : The most used platform by retail traders, simple and reliable.
2. "MetaTrader 5 (MT5)" : Advanced version of MT4, with faster execution and additional tools.
“RiskGuard” integrates seamlessly with all three, ensuring a smooth and optimized experience.
Note : Some features may vary slightly between platforms.
📌 Main benefits
Using "RiskGuard Management" offers numerous advantages to traders, regardless of their level of experience. Thanks to its advanced features, it helps improve risk management and optimize trading strategies.
1. Total risk control
-
Automate risk management and prevent emotional errors.
-
Avoid impulsive stop loss changes and ensure trading plan compliance.
-
Protects capital by setting maximum daily loss limits.
2. Trade Management Optimization
-
Automatically calculates the correct lot based on the selected risk.
-
It allows you to manage operations with "Partial Profit" , "Break-Even" and "Trade Replication".
-
Automate closing trades at a predefined time to avoid overnight swaps.
3. Greater operational efficiency
-
Reduces the time needed to calculate risk and set trading levels.
-
It works on "MetaTrader 4", "MetaTrader 5" and "cTrader" with an intuitive interface.
-
Automatically log every trade in the “Automatic Journal” for detailed performance analysis.
4. Adaptability to any trading style
-
Customizable with three usage modes: Beginner, Intermediate and Advanced.
-
Suitable for both scalpers and swing traders or position traders.
-
The "Quantum" algorithm allows you to optimize the risk based on the statistics of previous trades.
With these advantages, "RiskGuard" helps traders maintain discipline, improve their performance and operate with greater confidence.
Installation and Configuration
📌 Installation instructions
The installation of "RiskGuard" varies depending on the operating system used. Follow the guide below to configure it correctly on your platform.
1. Installation on Windows
-
Take the file located inside the "2.0 Software" folder.
-
Open "MetaTrader" and click on the "File" menu.
-
Select "Open Data Folder" .
-
Go to the "MQL4" or "MQL5" folder (depending on the version of "MetaTrader" you are using).
-
Go to the "Expert" folder and paste the file inside.
2. Installation on macOS
-
Take the file located inside the "2.0 Software" folder.
-
Open "Finder" and click "Go" in the top left menu.
-
Press and hold the "Option" key on your keyboard: an additional option called "Library" will appear.
-
Click on "Library" , then select "Application Support" .
-
Locate the folder corresponding to your "MetaTrader" installation.
-
Example: "net.metaquotes.wine.metatrader5" (the exact name may vary depending on your configuration).
-
-
Enter the "drive_c" folder.
-
If you are using "MetaTrader 4" , go to "Program Files (x86)" .
-
If you are using "MetaTrader 5" , go to "Program Files" .
-
Open the "MetaTrader 4" or "MetaTrader 5" folder, then navigate to "MQL4" or "MQL5" .
-
Select the "Expert" folder and paste the file into it.
📌 "MetaTrader" Configuration
To ensure the proper functioning of "RiskGuard", you need to configure the platform settings correctly. Follow the steps below to enable all the functions.
1. Enable the "Expert Advisor" options
-
Open "MetaTrader" .
-
Select "Tools" from the top menu.
-
Click on "Options" .
-
In the window that opens, go to the "Expert Advisor" tab.
-
Enable the following flags exactly as shown in the image:
-
"Allow algorithmic trading"
-
"Allow WebRequests for the following URLs" (https://www.riskguardmanagement.com)
-
Note : These settings are essential for "RiskGuard" to function properly, make sure you enable them before proceeding.

2. Activate "One-Click Trading"
After configuring the "Expert Advisor" settings, you need to enable the "One-Click Trading" feature, which is essential for fast and efficient order management.
-
In the settings window, go to the " Trading " tab.
-
Activate the "One-click trading" flag.
-
Confirm the changes by clicking "OK" .
Note : This operation must be repeated for each trading account associated with "MetaTrader" , as the option is not applied globally to all accounts.

3. Loading the Expert Advisor
Now that the "MetaTrader" settings are configured correctly, you need to load "RiskGuard" into the platform :
-
In the "MetaTrader" Navigator , locate the "Expert Advisor" section.
-
Double-click "RiskGuard" to load it onto the chart.
-
If the Expert is not visible, follow these steps:
-
Right-click on the "Expert Advisor" text in the Navigator.
-
Select "Update" .
-
Please wait a few seconds for the Expert to load.
-

4. License activation
Once you have loaded "RiskGuard" , you need to activate the license to start using it.
-
Double-click the newly loaded Expert.
-
The settings screen will appear.
-
In the first entry, where it says "License" , enter the purchase order number followed by _ and the email address used to purchase "RiskGuard".
-
Confirm the changes and the license will be activated automatically.
License activation example:
-
Order number : 12345
-
Email : mario.rossi@gmail.com
-
Correct format to insert : 12345_mario.rossi@gmail.com

5. Save the template for automatic loading
Once you have correctly configured "RiskGuard" and clicked OK , it is important to save the "MetaTrader" template to avoid having to repeat the configuration on each new chart.
Procedure to save the "RiskGuard" template
-
Right click on the graph.
-
Select "Templates" from the drop-down menu.
-
Click on "Save Template" .
-
Name it "default" and save.
Note :
-
This step is crucial because, every time you open a new tool, "RiskGuard" will automatically load on the chart with the saved settings.
-
If the "RiskGuard" parameters are changed, you must save the template again to keep the new settings active.


📌 Installing the "Journal"
⚠️ Notice for macOS users
If you use Excel on macOS, please note that due to a known bug in some newer versions of Excel (related to Power Query), you may experience issues when importing CSV data.
This is not caused by the RiskGuard Journal, but is a technical limitation of Excel itself.
If you encounter errors or malfunctions, we recommend considering the use of Excel version 16.90, which does not have these issues.
Download official Microsoft Excel 365 v16.90 version
The "Journal" of "RiskGuard" is a file that allows you to record and analyze trading operations in a detailed and automatic way. To use it correctly, you need to go through some configuration steps, which vary depending on the operating system.
1. Unlock File on Windows
Windows users must unlock the file before opening it to avoid security restrictions:
-
Right click on the "Journal " file you just downloaded.
-
Select "Properties" from the drop-down menu.
-
In the properties window, locate the "Security" section.
-
Check the "Unblock" box.
-
Click "OK" to confirm.
Note: This step is only necessary for Windows users . macOS users can skip it.

After opening the "Journal" , you need to set the path of the "File" folder correctly to allow the correct updating of data from "MetaTrader" .
2. Setting the path of the "File" folder
-
Open the "Journal" .
-
Go to the "Setting-Backtest" tab.
-
Locate the "Path Trade 1 " field.
-
Paste the path to the "File" folder (the same path used in the initial configuration of "RiskGuard" ).
-
Save settings.
Note: The path entered in this field will be used by the "Sync" button to automatically synchronize your trades.
If you use more than one MetaTrader platform, you can enter up to 10 paths (one for each installation), and the Journal will automatically update all trades found in each folder.

3. Setting the Screenshot Folder Path
-
Open the "Journal".
-
Go to the "Setting-Backtest" tab.
-
Locate the "Path Screenshot" field.
-
Follow the instructions based on your operating system:
For macOS users:
After the first trade is executed, RiskGuard will automatically create a folder named "Screen_RiskGuard", which you will find inside the Files folder of MetaTrader.
Manually copy this folder into OneDrive, under the Documents directory.
Paste the path of the copied folder into the "Path Screenshot" field.
For Windows users:
Select "ALL PATHS (only Windows)" from the dropdown menu.
The Journal will automatically scan all paths declared in the Path Trade 1, 2, … fields and check for matching screenshots.
If a match is found, the corresponding link will be added to the trade in the Journal.
Note: This difference is necessary because Excel on macOS does not allow automatic opening of links to files inside the MetaTrader “Files” folder due to permission restrictions. For this reason, both the journal and the screenshot folder must be located in the same OneDrive.
4. Button Functions in “Setting‑Backtest”
Inside the “Setting‑Backtest” tab, you’ll find four buttons for advanced Journal management:
-
Restoration
Completely removes the selected account (from the side menu) from the Journal. -
Restoration Link
Deletes all screenshot links related to the selected account, while keeping the trade records. -
Remote Suffix
Automatically removes extra characters added by some brokers from instrument names.
Example: entering .r will turn EURUSD.r into EURUSD. -
Failed
Marks the selected account as failed (e.g. in case of a prop firm failure), sets its balance to zero, but keeps the trade history.

Description of the Operating Panel
📌 Operation Panel – Configuration 1
What is "Configuration 1" and how does it work?
The "CONFIGURATION 1" mode is designed for trading with a fixed size and market entry . This configuration is used with the "BUY" and "SELL" buttons on the trading panel.
Main features:
-
Allows you to insert multiple orders of the same type (all Buy or all Sell).
-
Before the operation, the trader sets a maximum loss in % of the balance or in a fixed economic value .
-
After each new order, "RiskGuard" automatically updates the stop level to ensure that the set maximum loss is respected.
-
An orange line on the chart shows the next stop level if an additional order is placed.
Practical example:
If you set a maximum loss of $250 , you will always have that loss regardless of the number of orders .
-
If you have 2 orders of 1 lot , your maximum loss will remain $250 .
-
If you have 20 orders of 1 lot , your maximum loss will still be $250 .
This mode is designed to be viewed as a single trade , even if multiple orders are placed.

1. Panel Header
The header of the operating panel contains the basic elements to quickly navigate between configurations and manage the display of information.
Header elements:
-
"CONFIG. 1" (left corner) → Button that allows you to quickly switch from Configuration 1 to Configuration 2 and vice versa.
-
"RISKGUARD" (center, white writing) →This element acts as a button: when clicked, it reduces the panel showing only the header, hiding all other sections.
-
Trader level indicator (right corner) → Information label showing the current level of the trader set ( "Beginner", "Intermediate" or "Advanced" ).
-
Note : This item is for informational purposes only and is not a button.
"Profit/Loss" ("P/L") Viewer
Under the "RISKGUARD" text, still within the header, we find the "P/L" viewer , which shows the profit or loss of the current operation in real time.
Interactive function :
The "P/L" display also functions as a button and allows you to switch between different display modes:
-
Percentage (%)
-
Economic value (€ / $)
-
Risk/Reward (R:R)
-
Points ("Point")
-
Blank screen
Note : The selected mode is maintained until changed again.
2. "Trade Setup"
The "Trade Setup" section is dedicated to risk configuration and order management before entering the market. In this part of the panel, the trader can set the desired risk, risk/reward ratio and execution lot.
Elements of the "Trade Setup" section
-
"RISK" (top left corner) → Field to set the risk of the operation.
-
The value can be entered manually via the keyboard or adjusted with the "+" and "-" buttons.
-
-
Selectors "%" and "$" (in the center) → Two small buttons that allow you to choose whether to work with:
-
"%" → Sets the risk as a percentage of the balance .
-
"$" → Set the risk in fixed economic value .
-
-
"RR" (Risk/Return) (top right corner) → Field to define the risk/return ratio.
-
The value you enter determines how far away the take profit will be placed from the stop loss.
-
-
"BUY" and "SELL" (under "RISK") → Buttons to enter a direct market order .
-
"BUY" → Opens a buy (long) trade.
-
"SELL" → Opens a short trade.
-
-
"LT" (Lot) (bottom right corner) → Field where the lot size with which all orders will be opened is specified.
Note :
-
Each parameter can be changed before the first order is sent, ensuring flexibility in risk management.
-
Once the first position is opened, it will no longer be possible to change "RISK", "RR" and "LT" until the operation is closed.
3. "Trade Management"
The "Trade Management" section allows you to manage already executed orders, update stop and take profit levels, and quickly close a trade.
Elements of the "Trade Management" section
-
"BE" (Break-Even) → Moves all Stop Losses of open orders to the average entry price .
-
This way, the total profit and loss of those orders will be 0 (excluding commissions).
-
-
"UPDATE" → Updates Stop Loss and Take Profit levels on the broker as well.
-
This feature helps avoid slippage if the price is approaching the stop or target.
-
-
"CLOSE" → Closes all orders associated with that trade in one click.
Note :
-
The "BE" button is useful for protecting your capital , ensuring you do not incur losses if the price were to return to the entry point.
-
The "UPDATE" button ensures that the broker receives updated stops, reducing the risk of incorrect executions in volatile market conditions.
-
The "CLOSE" button closes the entire operation, regardless of the number of open orders .
4. "Trade Export"
The "Trade Export" section allows you to move the trading panel, export the trading history and access additional information about the trades.
Elements of the "Trade Export" section
-
"LEFT" / "RIGHT" → Button to move the panel from right to left of the screen and vice versa.
-
If the panel is on the right , the button shows "LEFT" .
-
If the panel is on the left , the button automatically changes to "RIGHT".
-
Note : This move is only temporary to definitively choose the position and set it in the settings.
-
-
"CSV" → Export the entire account history to a CSV file.
-
The generated file will then be read by the "Journal" , which will automatically import the trades for analysis.
-
Note : This feature is useful for maintaining a detailed history of operations , making it easier to monitor and analyze performance.
-
-
"INFO" → Expands a bottom panel showing 6 customizable parameters .
-
The visible parameters can be chosen in the panel settings, customizing the information most relevant to the trader.
-
Note :
-
The "CSV" button is essential for those who use the "Journal" to analyze their operations.
-
The "INFO" button allows you to view only the desired data , making the screen cleaner and more customizable.
📌 Operation Panel – Configuration 2
What is "Configuration 2" and how does it work?
The "CONFIGURATION 2" mode is the most common method of trading with "RiskGuard" . This system allows you to enter the market or place pending orders with an automatic lot calculation , simplifying operations and improving risk management.
Main features:
-
Automatic lot calculation → The system automatically determines the size of the trade based on the set risk.
-
Visual trade management → The trader only needs to place the Stop Loss and Take Profit lines directly on the chart.
-
Ability to take partial profits → You can set up to three Partial Take Profit levels.
-
Auto Break Even → Option to automatically move the Stop Loss to the entry point after the price reaches a predefined level.
Note:
-
This mode is ideal for those looking for speed and precision in execution , without having to manually calculate the size of the operation.
-
The trader has full control over the Stop Loss and Take Profit levels before confirming the trade.
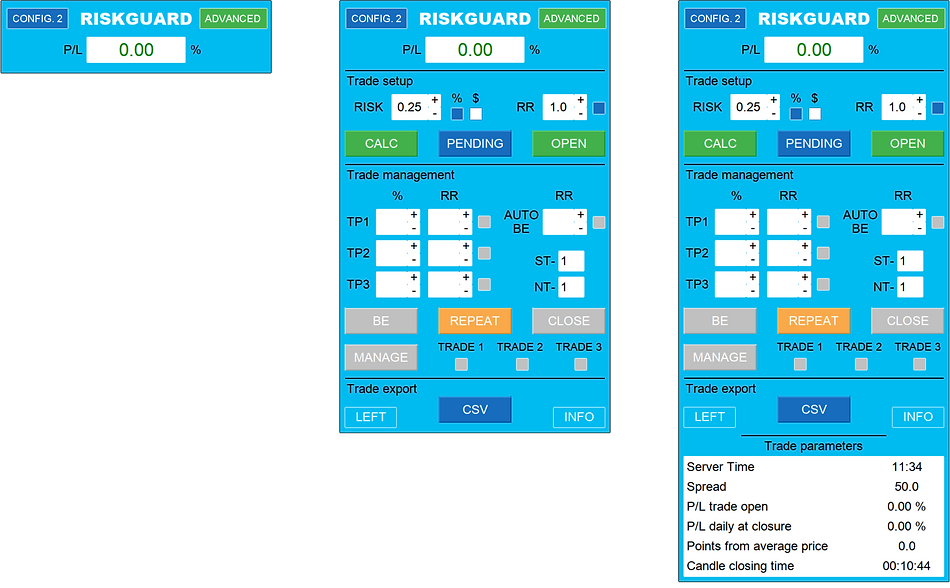
1. Panel Header
The panel header in "Configuration 2" is identical to that of "Configuration 1" . For a detailed description of its elements, please refer to the section:
Panel Header – "Configuration 1"
2. "Trade Setup"
-
"RISK" (top left corner) → Field to set the risk of the operation.
-
The value can be entered manually via the keyboard or adjusted with the " + " and " - " buttons.
-
-
Selectors "%" and "$" (in the center) → Two small buttons that allow you to choose how to calculate the risk:
-
"%" → Sets the risk as a percentage of the balance .
-
"$" → Set the risk in fixed economic value.
-
-
"RR" ( Risk/Return ) (top right corner) → Field to define the risk/return ratio.
-
If the selector is activated, the value entered determines how far away the Take Profit will be placed from the Stop Loss .
-
By moving the Stop Loss, the Take Profit will automatically follow the set ratio.
-
-
"CALC" (under "RISK") → Button to place Stop Loss and Take Profit levels on the chart.
-
"PENDING" (bottom center) → Button to set the entry level for pending orders .
-
"OPEN" (bottom right) → Button to confirm and execute the order .
Note:
-
This configuration allows you to clearly see all the levels of the operation on the chart before executing it .
-
The batch calculation is done automatically based on the set parameters.
-
If the "RR" selector is activated , the system will always maintain the proportion between Stop Loss and Take Profit .
3. Trade Management
The "Trade Management" section allows you to actively manage open trades, withdraw partial profits, set Break Even and replicate trades quickly and effectively.
Elements of the "Trade Management" section
A. Partial Profit Management
-
"TP1", "TP2" and "TP3 " → Three partial Take Profit levels.
-
Each label also acts as a button → When clicked, it immediately cashes out the partial profit.
-
Customizable withdrawal percentage → It is calculated with respect to the initial operation.
-
Example : If you open a trade with 10 lots and set a 30% on TP1 , when the price reaches TP1, you cash out 3 lots , leaving 7 lots still on the market.
-
-
Risk/Reward for each TP → Can be set manually or by dragging the level on the chart .
-
TP activation button → Small button that allows you to enable or disable partial withdrawal for each level.
-
B. Break Even and Position Protection
-
"AUTO BE" → By activating this button, a line appears on the graph.
-
The trader can drag it to the desired level or write the risk-reward with the keyboard.
-
When the price reaches this line, the Stop Loss will automatically be moved to the entry price , protecting the trade.
-
-
"BE" → Button to immediately set the Break Even, moving all Stop Losses to the entry price in just one click.
C. Operation Replica
-
"REPEAT" → Duplicates the Stop Loss and Take Profit levels of the last trade.
-
The trader can then adjust the risk and levels before confirming the trade.
-
The trade is confirmed by pressing "OPEN" .
-
Practical use:
-
Open a double entry on the same account .
-
Replicate the same operation on different accounts instantly.
-
-
D. Closing and Multi-Trade Management
-
"CLOSE" → Closes the selected trade or, if multiple trades have been selected, closes all indicated trades.
-
The selection is made via the buttons:
-
"TRADE 1"
-
"TRADE 2"
-
"TRADE 3"
-
-
-
"MANAGE" → Button with dynamic function , whose label changes automatically based on the action that will be performed.
-
If you have more than two open trades on the same financial instrument, you can exclude specific trades from "RiskGuard" management.
-
To do this, select the trades to exclude using the "TRADE 1" , "TRADE 2" , "TRADE 3" buttons.
-
The excluded trades will no longer be managed by "RiskGuard" , but will keep the Stop Loss and Take Profit, already sent to the broker.
-
At this point, it will be possible to open a further trade on the same financial instrument .
-
-
If a slot is free, the "MANAGE" button will allow you to re-import the trade into "RiskGuard" management , restoring the management of partial TPs and Auto Break Even .
-
Note:
-
Partial TPs and Automatic Break Even can be set after market entry or before the pending order.
-
The "REPEAT" button is useful for performing a quick double entry or for replicating the trade on multiple accounts without having to redraw the levels manually.
-
The "MANAGE" button allows you to manage multiple operations on the same instrument without limitations.
4. Trade Export
The "Trade Export" section maintains the same functionality as Configuration 1 .
For full details on the "LEFT" , "CSV" and "INFO" buttons, please refer to the section:
Trade Export – Configuration 1
Description of All Parameters
📌 Introduction
The "RiskGuard" parameters allow you to completely customize the functioning of the Expert Advisor according to the trader's needs.
They are divided into 5 main sections , each of which controls a specific aspect of operations.
Breakdown of parameters
1. License & Trading Level – Entering your license and setting your trader level.
2. "Configuration 1" – Specific parameters for the first trading configuration.
3. "Configuration 2" – Specific parameters for the second trading configuration.
4. “Money Management & Quantum” – Advanced risk management settings and Quantum algorithm.
5. "Graphics Setting" – Customizing the graphical interface and operating panel.
📌 License & Trading Level
Trader Level
The "Trading Level" allows you to select the level of experience of the trader, influencing the available features and operating restrictions.
There are three levels of trading:
-
"Beginner" → Maximum protection, with strong limitations on changes and operations not managed by the Expert Advisor.
-
"Intermediate" → Greater flexibility, with more freedom in managing operations.
-
"Advanced" → No restrictions, the trader has full control over all settings and operations.
Detailed description of features for each trader level
"Beginner" level:
-
Does not allow changing parameters with open trades.
-
It does not allow you to trade outside of the Expert Advisor.
-
Does not allow you to remove the Expert if there are open trades.
-
It does not allow you to increase the Stop Loss after the trade is opened.
-
Allows you to reduce the Stop Loss.
-
It does not allow you to increase the Take Profit after the trade is opened.
-
It does not allow you to reduce the Take Profit.
-
It does not allow you to change the trading account with open trades.
-
It does not allow you to exceed 10 open orders in Buy/Sell mode.
-
It does not allow you to exclude operations from Expert management.
-
Does not allow you to use Buy/Sell mode together with Standard mode.
-
Allows the Stop Loss to be automatically moved to Break Even (BE).
-
Allows disabling Algorithmic Trading (Algo Trading).
Intermediate Level:
-
Does not allow changing parameters with open trades.
-
It does not allow you to trade outside of the Expert Advisor.
-
Allows you to remove the Expert even with open operations.
-
It does not allow you to increase the Stop Loss after the trade is opened.
-
Allows you to reduce the Stop Loss.
-
Allows you to increase the Take Profit.
-
It allows you to reduce the Take Profit.
-
Allows you to change the trading account with open trades.
-
Allows you to exceed 10 open orders in Buy/Sell mode.
-
It does not allow you to exclude operations from Expert management.
-
Does not allow you to use Buy/Sell mode together with Standard mode.
-
Allows the Stop Loss to be automatically moved to Break Even (BE).
-
Allows disabling Algorithmic Trading (Algo Trading).
"Advanced" Level:
-
Allows you to change parameters with open trades.
-
Allows you to trade outside of the Expert Advisor.
-
Allows you to remove the Expert even with open operations.
-
It does not allow you to increase the Stop Loss after the trade is opened.
-
Allows you to reduce the Stop Loss.
-
Allows you to increase the Take Profit.
-
It allows you to reduce the Take Profit.
-
Allows you to change the trading account with open trades.
-
Allows you to exceed 10 open orders in Buy/Sell mode.
-
Allows you to exclude operations from Expert management.
-
Allows you to use Buy/Sell mode together with Standard mode.
-
Allows the Stop Loss to be automatically moved to Break Even (BE).
-
Allows disabling Algorithmic Trading (Algo Trading).
Attention! Effects of changing the Advanced level
WARNING! Changing the "Advanced" level, "RiskGuard" to prevent some functions will close orders whether they were made with "RiskGuard" or not, this can happen if you open the metatrader with "RiskGuard" and you have orders running on that specific instrument or account (depending on the situation).
Pay special attention to the functions below and I'll give you some examples of use.
Function allows changing parameters with open trades
Where marked with Do not allow if you change or otherwise open the settings and then press the “ok” button "RiskGuard" will close any open orders to prevent you from going out of your plan by changing for example the maximum daily loss.
Function allows trading outside of expert
Where marked with Do not allow "RiskGuard" will close any open order without "RiskGuard" . This example feature is useful for those who have trouble controlling themselves from opening trades from smartphone and want to prevent it. Every new order you make via smartphone if "RiskGuard" is active on a PC or VPS will close it.
Function allows expert removal with open trades
Where marked with Do Not Allow "RiskGuard" will close any open order whether or not it is "RiskGuard". This function can prevent example that if you are about to reach the maximum daily loss you have set and you remove "RiskGuard" thinking you are cheating it and can lose more it anticipates you by closing everything to prevent you from not respecting your rules.
Function allows account switching with open trades
Where marked with Does Not Allow "RiskGuard" will close any open orders whether through "RiskGuard" or not. This feature is intended to help the novice trader focus on just one trading account.
Function allows disabling Algo Trading
If you disable Algo Trading based on the selected trader level you will be prevented from using the expert for a certain amount of time on that account, again to avoid being tempted to trick RiskGuard into exiting the trading plan.
📌 "CONFIGURATION 1"
"Lots per trade (Buy and Sell Buttons)"
-
Fixed size value to use with the “Buy” and “Sell” buttons.
"Initial Stop Loss (points) used to compute lot size"
-
In this parameter, you can enter the stop loss points for the first order in CONFIG.1. This value will be used to automatically calculate the lot size based on the defined risk.
"Initial risk calculation method (Buttons Buy e Sell)"
-
Here you can choose the risk calculation method when opening a trade via the Buy or Sell buttons:
-
If you select lot, you manually define the lot size.
-
If you select points, you enter the stop loss points and the system will automatically calculate the appropriate lot size based on the risk.
-
"R:R (Buy and Sell Buttons)"
-
When opening a trade the expert will set a stop loss level and a take profit level that cannot be changed. I recommend setting the take profit level higher as this type of trading is usually closed manually with the “Close” button.
"Max. trade number (Buy and Sell Buttons)"
-
Maximum number of orders allowed in the same operation (for “Beginner traders” the maximum is still 10).
"Trade pause timer (Buy and Sell Buttons)"
-
This setting is a value expressed in seconds and will block the “Buy” and “Sell” buttons for the set time (useful to avoid rushing orders)
"Points minimum margin stopLoss (Buy and Sell Buttons)"
-
Setting expressed in points that will prevent adding an order if that order would bring the distance between the current price and the stop loss to a value lower than the one set.
"Risk per trade (Buttons Buy and Sell)" and "Type risk per trade (Buttons Buy and Sell)"
-
Risk choice per trade, in this case the example shows a risk of 1% of your balance per trade. You have the option to choose a risk in % or in economic value
📌 "CONFIGURATION 2"
"Average spread in points"
-
This is one of the most useful parameters for the less experienced as we are used to seeing only the Bid price on a graph. This parameter that must be set for each instrument allows you to automatically set the stop, the take and the entry price in case of pending, taking into account the spread that we declare. Even the risk return that the expert will indicate to us takes into account the spread.
"Automatic Spread"
-
This parameter if set to true works exactly like the point described above except that the spread value is automatically set by calculating the spread at the exact moment the operation is opened.
"Commissioni per lotto"
-
This parameter is useful for those who use commission accounts (raw), by entering the commission value that your broker provides you when calculating the lot, it will set the value in such a way that your loss is total of the commissions.
"Risk per trade" and "Type risk per trade"
-
Exactly like the parameters of configuration 1 to give the possibility to choose a different risk between one configuration and another.
"Points BE in profit"
-
This parameter is actually used for both modes, configuration 1 and configuration 2. When the “BE” button is pressed it will move the stop loss level, in this case 1 point above the entry price or the average price in case of “CONFIG. 1”.
"Value R:R auto BE"
-
This parameter allows you to set the risk return that once reached will automatically move the stop to BE. It only works with the Senior Trader level as this type of function is active only on the account that is currently active. If your trade is on a second account this function will be executed from the moment you log in to your account.
"R:R (MODE 2)"
-
This parameter gives you the possibility to maintain a preset risk-return ratio when calculating your operation. Obviously, you are then free to change it from the operator panel.
"%TP 1" and "%TP 2" and "%TP 3"
-
These 3 parameters are to indicate the risk return of where to take the partial. If the value is left at 0 when you open the operation you can still add the partial from the panel, if instead you write the value when you open the operation it will also automatically put the partial level and this also when you open via smartphone.
"Strategy from 1 to 20" and "Note from 1 to 20"
-
Here you can set the strategy and notes you prefer by default, every time you open a trade after clicking on calc the two fields will also appear on the panel and from there you can change the values. Once you open a trade it will no longer be possible to change the strategy and note of that trade. You will automatically find these notes and strategies on the journal to be able to do an analysis with all the possible combinations.
"Close trade at this server time : (0=deactivated) (hh:mm)"
-
This parameter is used to indicate a time that refers to the server time and is used to close all open trades in the respective instrument. For example, if we enter 21:00, at 21 server time, all trades will be closed. Leaving the parameter at 0 will deactivate the function.
"Close Pending at this server time: (0=deactivated) (hh:mm)"
-
This parameter is used to indicate a time that refers to the server time and is used to close all pending trades in the respective instrument. For example, if we enter 21:00 he at 21 server time will close all pending trades. Leaving the parameter at 0 the function is deactivated.
"Opened from your smartphone lot minimum"
-
This parameter allows, if activated (true), Advanced level traders to use their smartphone or tablet with the original metatrader application to open pending orders or market with the lot calculation performed by riskguard. Simply open an order at 0.01 lot and insert the stop and the order will be automatically deleted and reopened at the lot calculated based on the risk declared on riskguard. You can use the auto be auto spread function and all the riskguard functions as if you were opening the order exactly from your PC. Obviously, to use this function, you either use a VPS or in any case riskguard must be active on a PC.
"Stop the budget balance day %"
-
This function serves as a daily safety stop, the expert will take the value of the balance from 00:00 (server time) example balance 100,000 dollars when reaching 90,000 dollars of equity it will close all orders of all instruments with active expert whether they were entered with expert or not. This function also works only on the account currently in use.
"Stop the drawdown balance day %"
-
This function is exactly like the function described above with the difference that the percentage will be taken from your maximum daily balance. Example for the first trade of the day the stop level will be the same as above of 90,000, but if our maximum daily balance will have touched 110,000 the 10% will be on 110,000 so the stop will be at 99,000.
"Stop the day if R losses reach this value"
-
Enter the number of R losses from closed trades for the current day. Once this value is reached (e.g. 2), trading will be blocked until the next day and all open positions will be automatically closed.
"Stop the day if R gains reach this value"
-
Enter the number of R gains from closed trades for the current day. Once this value is reached (e.g. 3), trading will be blocked until the next day and all open positions will be automatically closed.
📌 "MONEY MANAGEMENT QUANTUM"
"Number of winning trades from previous account"
-
Enter here the number of profitable trades from your previous account. This allows Quantum to continue seamlessly and operate correctly from the very first trade on the new account.
"Number of Losing trades from previous account"
-
Enter here the number of losing trades from your previous account. This allows Quantum to continue seamlessly and operate correctly from the very first trade on the new account.
"Total percent Profit from previous account"
-
Enter here the total percentage of profit achieved on your previous account. This allows Quantum to continue seamlessly and operate correctly from the very first trade on the new account.
"Total percent Losses from previous account"
-
Enter here the total percentage of loss recorded on your previous account. This allows Quantum to continue seamlessly and operate correctly from the very first trade on the new account.
"Activate Quantum function"
-
By selecting "true", the function is activated. By selecting "false", "QUANTUM" is disabled.
"Maximum drawdown %"
-
Here you must declare the maximum drawdown you are willing to accept. This value will be used by the algorithm to calculate your risk based on your statistics and help prevent you from exceeding it. The drawdown refers to the total account, not on a daily basis.
"Maximum risk single trade %"
-
This parameter sets a cap on the maximum risk per single trade, useful especially to avoid being banned by prop firms, even if your statistics would allow for higher risk. The minimum risk below which you cannot go is 0.05%.
📌 "GRAPHICS SETTINGS"
"Position of the panel"
-
This parameter allows you to choose the position of the panel, whether to the right or left by default.
"Panel dimensions"
-
This parameter allows you to increase or decrease the size of the panel on the chart.
"Font size"
-
This parameter allows you to increase or decrease the size of the text in the panel on the chart.
"Position calculation lines from price in %"
-
This parameter is used to adjust the distance of the stop and take lines from the current price each time the “Calc” button is pressed.
"Enable Automatic Screenshots"
-
Setting this to true enables automatic chart screenshots: one will be taken when a trade opens, and another when it closes.
-
With MetaTrader 5, there are no limitations – you can minimize the platform, and the screenshot will still capture the full chart window correctly.
-
With MetaTrader 4, due to platform restrictions (not caused by RiskGuard), the MetaTrader window must remain fully visible and maximized; otherwise, the screenshot may not be captured properly.
-
Screenshots are automatically saved in the Files folder, inside a subfolder called "Screen_RiskGuard", which is created upon first use.
-
It is recommended – and mandatory for macOS users – to manually copy this folder to OneDrive and add the folder link in the Journal settings, to ensure Excel can access the files correctly.
"Screenshot Delay (ms)"
-
Here you can set a delay in milliseconds to slightly postpone the moment the screenshot is taken.
-
This is useful if you want to give the chart time to fully update before the capture.
"Line thickness"
-
This parameter is used to adjust the thickness of the lines in the graph except for the dashed lines indicating the spread which will always have a fixed size.
"View labels"
-
This parameter is used to choose whether to display the labels placed in the graph lines. True are visible and false are hidden.
"Enable confirmation sound"
-
This parameter allows you to enable or disable confirmation sounds. If set to true, sounds are enabled; if set to false, they are disabled.
"Enable error sound"
-
This parameter allows you to enable or disable error sounds. If set to true, sounds are enabled; if set to false, they are disabled.
"Stop Loss Pending Band Color" and "Stop Loss Band Color" and "Take Profit Band Color"
-
On these parameters you can customize the color of the bands of your operation. On Macs to change the color you need to double click on it and press F4 on the keyboard
“View on field 1” and “View on field 2” and “View on field 3” and “View on field 4” and “View on field 5” and “View on field 6”
-
Here you have the possibility to choose what to display in the 6 fields that appear in the info table
"Parameter to multiply the points display"
-
This parameter is used to change the display on the panel of those parameters that display points, by decreasing the multiplier you can switch to pips for convenience.
"Slippage: Tolerance in points per trade"
-
This parameter is used to set the maximum slippage accepted to execute or not an order (if we issue a pending order to buy at a price of 1.0000 on eurusd in case of high volatility it means that we will accept to buy within a tolerance of 3 points, beyond which the order will not be issued)
Description of "RiskGuard" Functions
📌 Introduction
“RiskGuard” offers a range of advanced features designed to improve risk management and ensure total operational control.
Each function has a specific purpose and helps the trader to optimize his trading, reducing errors and improving trading efficiency.
Here is the complete list of available features:
-
"Lot Calculator" – Automatically calculates the optimal lot for each trade.
-
"Automatic Spread" – Automatically adjusts the "Stop Loss" and "Take Profit" levels considering the spread.
-
"Automatic Break-Even" – Automatically moves the "Stop Loss" to the entry price.
-
"Partial Profit" – Allows you to partially withdraw profits at predefined levels.
-
"Stop Loss and DD Block" – Protects capital by preventing risky changes to orders.
-
"Closing Time" – Automatically closes trades at a pre-set time.
-
"Smartphone Trading" – Automatically calculate the lot by trading from your smartphone.
-
"Repeat Trade" – Allows you to replicate a trade with the same parameters.
-
"Automatic Journal" – Automatically records all operations for detailed analysis.
-
"Quantum" – Advanced algorithm for optimized risk management.

📌 "Lot Calculator"
The "Lot Calculator " function is essential for every trader who wants accuracy and speed in opening orders.
This feature allows you to automatically calculate the lot size based on the defined risk, eliminating manual errors and ensuring optimal execution.
How it works
1. Risk definition
-
The trader chooses whether to define the risk:
-
In percentage (%) → Percentage of account balance.
-
In fixed economic value ($) → Fixed amount per transaction.
-
-
2. Positioning the lines
-
By pressing the "CALC" button, two lines will appear on the graph:
-
Red line → Indicates the "Stop Loss" level.
-
Green line → Indicates the "Take Profit" level.
-
-
The trader can drag the line labels and position them at the desired levels.
3. Execution of the order at the market
-
Once you have placed the lines, just click the "OPEN" button to perform the operation.
-
The order will be opened instantly with the correct lot , calculated based on the selected risk.
4. Execution of a pending order
-
If you want to place a pending order , the process is the same with just one more step:
-
Before clicking "OPEN" , press the "PENDING" button.
-
A blue line will appear on the chart, representing the entry level of the order.
-
Drag the blue line to the desired level and then click "OPEN" to confirm the operation.
-
Note:
-
The "Lot Calculator" always calculates the most accurate lot size possible based on the set risk.
-
This system avoids incorrect manual calculations and allows the trader to focus exclusively on the strategy.
📌 "Automatic Spread"
The "Automatic Spread" function is among the most appreciated of "RiskGuard" as it eliminates the risk of spread-related errors and ensures precise management of entry and exit levels.
How it works
1. Activation of the function
-
To activate "Automatic Spread" , simply set the corresponding parameter in the "RiskGuard" settings to "true" .
2. Automatic spread calculation
-
When the trader places the "Stop Loss" , "Take Profit " or entry price lines of a pending order, the system takes into account the value of the current spread.
-
As soon as the "OPEN" button is pressed, "RiskGuard" performs the precise calculation of the spread at that moment.
3. Automatic Level Correction
-
SELL orders:
-
The Stop Loss and Take Profit are adjusted upwards to include the value of the spread.
-
-
BUY orders at market:
-
The Stop Loss and Take Profit remain unchanged.
-
-
Pending BUY orders:
-
The entry price is adjusted upwards to include the spread, while Stop Loss and Take Profit remain unchanged.
-
Advantages of "Automatic Spread"
-
Avoid manual errors in spread calculation.
-
Increases the accuracy of your trade by ensuring that your “Stop Loss” and “Take Profit” levels are correct at the time of execution.
-
Eliminates the need to manually check the spread before opening a trade.
📌 "Automatic Break Even"
The "Automatic Break-Even" function allows you to protect a trade by automatically moving the "Stop Loss" to the entry price once the price reaches a pre-set level.
How it works
1. Automatic activation via settings
-
If a risk/reward value is set in the settings panel, "Automatic Break-Even" will be automatically activated when opening the trade.
-
The system will set a level that, once touched by the price, will move the "Stop Loss" to the entry price.
2. Manual activation and modification
-
If it has not been set in the settings, the function can be activated manually from the control panel , even after opening the order.
-
The "Break Even" activation level can be changed at will after the trade is opened.
3. Compatibility with smartphone orders
-
If "Automatic Break-Even" is active in the settings, it will also work when opening an order from a smartphone (provided that the "Smartphone Trading" function is also active).
4. Important limitation – Active connection on MetaTrader
-
"Automatic Break-Even " works only if MetaTrader is active with "RiskGuard" on the specific trading account.
-
Attention! If you open an order and set the "Break-Even" on Account 1 , but then switch to Account 2 , the function will no longer be active on Account 1 .
-
Reason : "RiskGuard" only works on the account it is currently active in , so it cannot handle trades on another account when the trader switches accounts.
Advantages of "Automatic Break-Even"
-
It protects capital by locking in profits when the price goes above a certain level.
-
It reduces risk by preventing a profitable trade from turning into a loss.
-
It also works for smartphone orders , ensuring automatic protection at all times.
📌 "Partial Profit"
The "Partial Profit" function allows you to automatically withdraw a portion of your profits at pre-set levels, closing only a fraction of the trade and leaving the rest in the market.
How it works
1. Automatic activation via settings
-
If a "Partial Profit" level is set in the settings, "RiskGuard" will automatically activate the function when opening a trade.
-
The system will set up to three withdrawal levels: "TP1" , "TP2" and "TP3".
-
When the price reaches one of these levels, a percentage of the trade will be closed, leaving the rest in the market.
2. Compatibility with smartphone orders
-
If "Partial Profit" is active in the settings, it will also work for orders opened from smartphones , provided that the "Smartphone Trading" function is also active.
3. Withdrawal Percentage Rules
-
Since there are three levels of "Partial Profit" , the sum of the percentages set on TP1, TP2 and TP3 must be less than 100%.
-
Reason : There must always be a residual percentage left for the final Take Profit , otherwise the trade would be completely closed before reaching the main target.
4. Immediate manual withdrawal
-
In addition to automatic activation, you can perform an instant withdrawal directly from the panel.
-
How to : Simply click directly on the label of the desired TP (e.g. "TP1") and the partial profit will be withdrawn immediately.
5. Important limitation – Active connection on MetaTrader
-
"Partial Profit" works only if MetaTrader is active with "RiskGuard" on the specific trading account.
-
Attention! If you set "Partial Profit" on Account 1 but then switch to Account 2 , the function will no longer be active on Account 1 because "RiskGuard" cannot handle operations on different accounts at the same time.
Advantages of "Partial Profit"
-
It allows you to cash in profits without closing the entire operation.
-
Optimize risk management by reducing exposure as the trade develops.
-
It also works for smartphone orders , ensuring automatic protection at all times.
-
Possibility of instant manual withdrawal , useful for closing a part of the operation without waiting for the predefined levels to be reached.
📌 "Stop Loss and DD Block"
The “Stop Loss and DD Block” feature is the heart of “RiskGuard” and was designed to address one of the most common problems among traders : the difficulty of accepting a loss and sticking to their risk management plan.
Why is it essential?
Many traders, especially beginners, tend to move their Stop Loss when the price approaches the pre-established level, increasing the risk with the hope that the market will turn in their favor.
This behavior often leads to losses much larger than expected , compromising capital management and putting the entire trading account at risk.
"RiskGuard" prevents this behavior with a feature that is blocked by default , which cannot be disabled .
How does it work?
1. Stop Loss Block
-
Once you set your Stop Loss , you cannot increase or eliminate it.
-
The trader can only reduce it or take it to profit , but once reduced there is no going back .
-
Reason : This ensures that the risk is never increased beyond the set level.
2. Daily Loss Block (DD Block)
"RiskGuard" offers double protection to avoid excessive losses in a single day .
-
Maximum loss based on initial balance
-
The trader can set a maximum loss percentage calculated on the initial balance of the day .
-
Example : If your balance at the start of the day is $100,000 and you set a limit of 1% , when it reaches $99,000 all trades will be closed automatically .
-
RiskGuard will prevent any further trading on that account until the following midnight.
-
-
Maximum loss based on daily drawdown
-
The trader can also set a maximum acceptable Drawdown threshold for the day .
-
If the Maximum Drawdown is exceeded, all trades will be closed and the account will be locked until the following midnight .
-
Important note:
-
This feature is active by default and cannot be deactivated for any trader level.
-
"RiskGuard" does not allow you to bypass this block in any way , ensuring capital protection and compliance with the trading plan.
Benefits of “Stop Loss and DD Block”
-
Avoids increased risk during a trade, ensuring trader discipline.
-
Protects your account from excessive losses by blocking trading when you reach your set daily limit.
-
It prevents emotional mistakes by forcing the trader to respect his Stop Loss.
📌 "Closing Time"
The “Closing Time” feature is particularly useful for traders operating with intraday strategies , offering complete control over the closing times of trades.
This function allows you to:
1. Automatically close all running orders at a pre-set time.
2. Cancel pending orders if they have not been executed within a certain time.
How does it work?
1. Automatic closing of market orders
-
The trader can set a specific time when "RiskGuard" will automatically close all open orders .
-
Useful for :
-
Avoid leaving trades open overnight and incurring swap costs .
-
Avoid unwanted stops due to the increase in spread during the daily change.
-
-
Example:
-
If 23:59 is set, all open orders will be closed before midnight , avoiding rollover exposure.
-
2. Automatic cancellation of pending orders
-
The trader can set a cut-off time for pending orders.
-
If an order has not yet entered the market by that time , it will be automatically cancelled.
-
Useful for:
-
Prevent pending orders from remaining active for too long and from being executed in unfavorable market conditions.
-
Maintain control over scheduled orders , without risking them coming in at inopportune times.
-
-
Example:
-
If 16:00 is set, any pending orders that have not been executed by that time will be automatically deleted .
-
Benefits of "Closing Time"
-
Avoid unnecessary swap costs by closing trades before rolling over overnight.
-
Protects against spread and volatility changes at the end of the day.
-
Automatically deletes unused pending orders, preventing unwanted executions.
-
It ensures efficient management of intraday trading, without leaving active trades beyond the expected time.
📌 "Repeat Trade"
The "Repeat Trade" function allows you to quickly replicate a trade already executed , maintaining the same Stop Loss , Take Profit levels and, in the case of a pending order, also the entry price .
This feature is extremely useful for those who want to repeat a trade on the same account or replicate it on a different account , offering a quick and efficient method to re-enter the market.
How does it work?
1. Automatic storage of the last trade
-
"RiskGuard" automatically saves the levels of:
-
Stop Loss
-
Take Profit
-
Entry price (if it is a pending order)
-
-
This allows you to recall these levels at any time .
2. Repositioning the graph levels
-
By pressing the "REPEAT" button in the panel, the stored levels will be repositioned in the graph.
-
At this point, the trader has two options:
-
Confirm the trade exactly as it is , keeping the same risk and clicking "OPEN".
-
Change parameters before confirming:
-
You can change the risk before opening the order.
-
You can move the Stop Loss and Take Profit levels to adapt your strategy.
-
-
3. Replicate the operation on different accounts
-
"Repeat Trade" can also be used to replicate a trade on another account .
-
How to do :
-
After opening a trade on one account, simply switch accounts on MetaTrader and press "REPEAT" again.
-
The procedure remains the same: the trader can confirm or modify the parameters before opening the order.
-
Advantages of "Repeat Trade"
-
It allows you to quickly re-enter the market with the same conditions as the last trade.
-
It facilitates multi-account management , allowing you to replicate operations on different accounts.
-
It offers flexibility , allowing you to change the risk and levels before execution.
-
Avoid manual errors by automatically repositioning layers without having to calculate them again.
📌 "Smartphone Trading"
The "Smartphone Trading" function allows you to operate on MetaTrader Mobile or cTrader Mobile , while still maintaining the protections and automatic calculations of "RiskGuard" active.
This feature is ideal for traders who want to open trades on the go , without losing control over risk management.
How does it work?
1. Opening an order with a minimum lot
-
When a trader opens a trade on MetaTrader Mobile or cTrader Mobile , it is initially opened with the minimum lot size available for the financial instrument.
-
This is to notify "RiskGuard" that a new trade has been opened.
2. Automatic calculation of the correct size
-
"RiskGuard" detects the operation and instantly calculates the correct lot , based on the risk set in the settings .
-
Subsequently:
-
The order with the minimum lot is closed automatically .
-
A new order is opened with the correct size calculated based on the selected risk.
-
3. Automatic protection management
-
If the "Automatic Break-Even" and "Partial Profit" functions are activated in the control panel , these will also be automatically applied to orders opened from smartphones.
-
"RiskGuard" will automatically set:
-
Stop Loss and Take Profit based on user settings.
-
Partial levels (TP1, TP2, TP3) and Auto Break-Even , if activated in the parameters.
-
4. Necessary condition for operation
-
"Smartphone Trading" only works if "RiskGuard" is active on a PC or VPS connected to the trading account.
-
If "RiskGuard" is not running , the order opened from the smartphone will remain unchanged, without any automatic changes.
Advantages of "Smartphone Trading"
-
It allows you to operate from mobile without losing control over risk management.
-
Automatically calculates the correct lot , avoiding manual errors in order size.
-
Automatically applies Stop Loss, Take Profit, Break Even and Partials , if activated in the settings.
-
It works with MetaTrader 4, MetaTrader 5 and cTrader Mobile , ensuring maximum compatibility.
Note:
-
It is recommended to always leave "RiskGuard" active on a PC or VPS to ensure the function works properly.
📌 "Automatic Journal"
The "Automatic Journal" function allows you to automatically record all trading operations carried out on your current account and export them to a text file , which will then be processed by the journal in Excel.
This feature is essential for those who want to analyze their trades and track performance over time.
How does it work?
1. Exporting operations
-
When the trader presses the "CSV" button, "RiskGuard" generates a text file containing all trading operations related to the current account.
-
The file is saved in a default folder within your computer .
2. Automatic processing with journal in Excel
-
The exported file is automatically read by the journal in Excel , which takes care of:
-
Reprocess the data .
-
Import operations into the internal journal database.
-
Update statistics to provide a clear view of trading performance.
-
3. Continuous updating of the text file
-
Each time the "CSV" button is pressed, the text file will be overwritten with the most recent operations.
-
The journal in Excel will then reprocess the data and update the report without duplicating operations already recorded.
Advantages of "Automatic Journal"
-
Automatically records all trades , eliminating the need to manually enter trades.
-
It provides a detailed analysis of your trading , making it easy to monitor your performance.
-
Avoid errors and duplications by automatically updating data every time you press "CSV".
-
Useful for backtesting and strategic review , allowing you to identify strengths and weaknesses in your trading.
Note:
-
For a detailed explanation of the journal features, you can watch the dedicated video in the "Installation and Configuration" section.
📌 "Quantum"
“Quantum” is “RiskGuard” proprietary algorithm designed to optimize risk management and improve trading stability.
This feature analyzes the account's trading statistics in real time , allowing the trader to maximize profits while maintaining a controlled drawdown.
How does it work?
1. Account Statistics Analysis
-
"Quantum" examines the historical data of the operations carried out by the trader, collecting information on:
-
Past profits and losses.
-
Maximum drawdown reached.
-
Distribution of winning and losing trades.
-
Overall account exposure.
-
2. Calculating the optimal risk
-
Based on the analyzed statistics, "Quantum" automatically calculates the ideal risk for each operation.
-
The goal is to avoid exceeding the maximum drawdown declared by the trader , maintaining a balance between capital growth and safety.
3. Dynamic batch size adaptation
-
"Quantum" automatically adjusts the risk percentage per trade , adapting it to the conditions of the account.
-
If the calculated risk exceeds the acceptable threshold, the algorithm automatically reduces the exposure , avoiding potentially harmful situations.
4. Simulator to test the algorithm
-
"RiskGuard" offers a free simulator that allows you to test the operation of "Quantum" before using it in real operations.
-
The simulator shows how the algorithm can increase profitability in the long term, keeping the drawdown under control.
Advantages of "Quantum"
-
Maximize profits by optimizing risk based on the trader's personal statistics.
-
Reduces drawdown , avoiding excessive exposures that could compromise the account.
-
Dynamically adapts lot size , maintaining a balance between security and performance.
-
Prevents emotional errors by removing irrational decisions related to risk management.
-
Available in simulation mode , allowing you to test its effectiveness before applying it to your real account.
Note:
-
“Quantum” is ideal for experienced traders who want to take a scientific approach to risk management.
-
Using the simulator before activating it allows you to better understand how it works and evaluate its impact on your operations.